You must have the G2000 model gateway (all in one), its power cable, an Ethernet cable, a computer and Internet access via Ethernet.
- Product description

- How to connect antennas to the gateway?
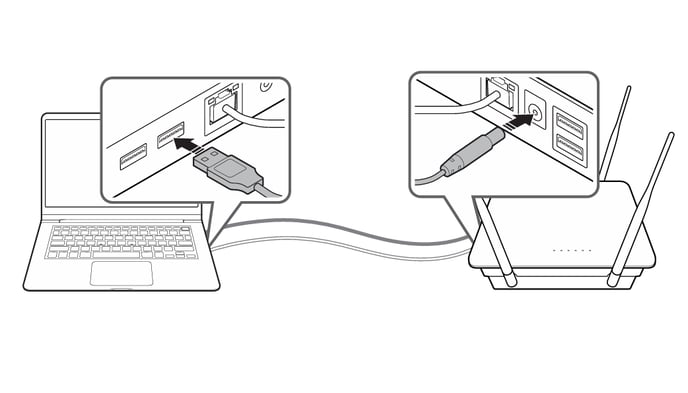
- Connect each antenna to a connector on the gateway.
- Rotate the antenna clockwise to secure it in place.

- Connect the Ethernet cable to the gateway, then connect the other end of the cable to your computer.
 Connect the power cable to the gateway, then connect the other end to a USB port on your computer or to a power outlet (this cable may vary).
 To access the gateway it will now be necessary to configure the computer's network adapter.
4. Configure the network adapter
- To access the gateway for the first time, you need to configure a static IP address on the computer's Ethernet adapter.
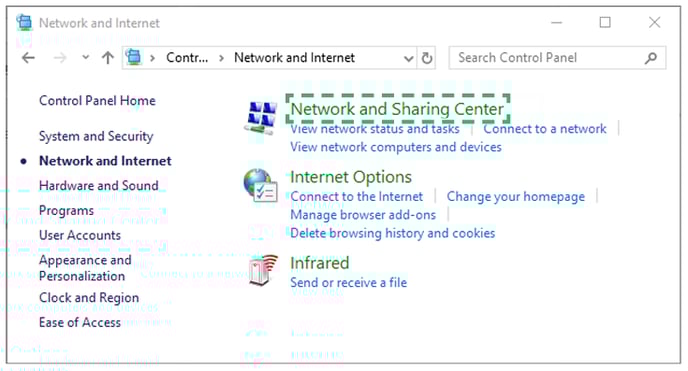
- Open Control Panel > Network and Sharing Center
-
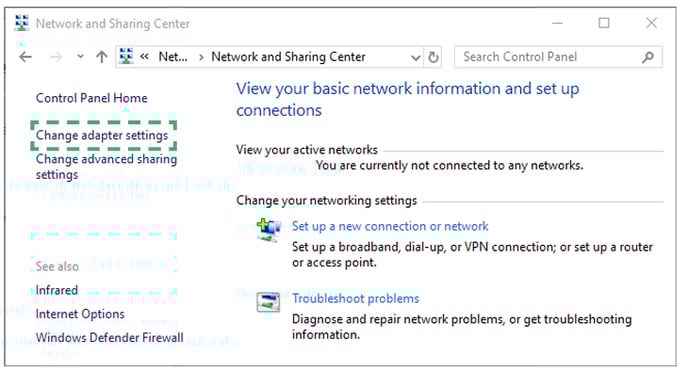
- In the left pane, click "Change adapter settings".
-
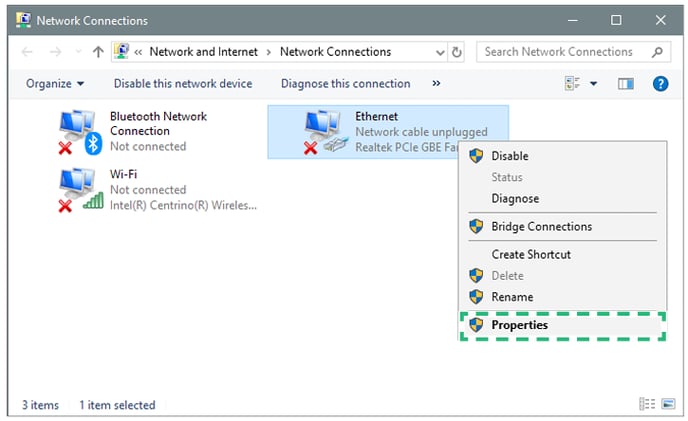
- Right-click Ethernet (Local Area Connection) and click Properties.
-
- Select Internet Protocol Version 4 (TCP/IPv4) and then click Properties.

Select "Use the following IP address" and then enter the following values in each field:
- Enter the IP address 192.168.220.45 in the "IP Address" field.
- Enter 255.255.255.0 in the "Subnet Mask" field.

The Ethernet adapter is now configured to use 192.168.220.45 as the IP address and the Gateway can be accessed at http://192.168.220.206 in a web browser.
Open a web browser on the computer to which the gateway is connected and
type the IP “192. 168. 220. 206”.
- It is recommended to use the Google Chrome browser.

Enter the ID and password and then click the Login button.
• ID: admin
• Default password: 1234

You will be able to view the status and configure the gateway:

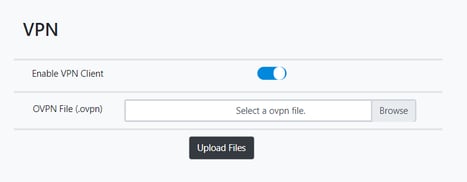
Next, you will need to upload the VPN file generated specifically for each store and gateway. This file is unique and non-transferable.
Now capture the following information before saving the configuration:
- The IP and gateway information will depend on the local internet configuration.
- The "ESL Server IP" and "Store code" information will be provided for each gateway.
Click on the button in the upper right corner to save it, once this process is finished you will no longer be able to see the configuration page with that IP address, you must have the IP you previously configured on hand to enter it.

6. Connect the gateway via ethernet for internet output
Disconnect the gateway from the PC and from the power supply and now connect it so that it has internet access via ethernet cable and back to the power supply.
- Open a web browser on the computer to which the gateway is connected and type the assigned IP “xxx. xxx. xxx. xxx”.
- You will see the same configuration page as before. You do not need to configure anything else.
- Once this process is done, your gateway is ready and configured.
Notes:
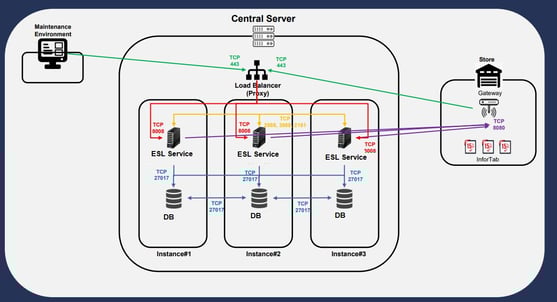
The ports that must be available are the following:
From the Gateway to our server: port 443.
TCP: port 8080.